Fortunately it's very easy to design new maps for Trigger Rally. That's good! This means we can spend more time on optimizing our maps to make them not only interesting and challenging, but beautiful and usable as well.
It is not hard to set up an impossible or a really easy track. It is much harder to design a good looking interesting map which is fun to race without it being too frustrating or boring.
Thanks to Jasmine Langridge's great programming, it's not necessary to have specialist technical skills to make desirable new maps.
Many available maps and events have been created using this guide.
The easiest way to start with a new map for Trigger Rally is to copy an existing map folder, like dry and adapt its names, values and images. To do this you need to locate the Trigger Rally data folder on your system. Just look for the trigger-rally.config.defs file. You should find it in the needed folder.
Every map has it's own sub folder in the trigger-rally/data/maps folder, containing its images and the .level XML definition file. Usually the folder carries the same name as the .level file, but leaves out the .level extension. For example: maps/frozen/frozen.level.
It is possible to use the same map for different races. To do this, just add a .level-file (with a distinctive name) for each race in your folder. This enables you to re-use the same maps with different weather conditions and checkpoints.
For creating the level design images, please read the track tutorial.
XML settings for maps
The .level file in each map folder contains important configuration settings for this map. You need to understand the meaning of the available attributes for being able to set up your own map properly. In the following overview I describe the meaning of all possible values:
Example
<?xml version="1.0" ?>
<levelnames, description, comments and preview files
name="Example Map"
comment="Start comment"
author="Name"
description="description for map selection menu"
screenshot="ss.png"
minimap="mm.png">
<terrainbasic source files and attributes of the map
heightmap="h.png"
colormap="c.png"
hudmap="m.png"
foliagemap="f.png"
roadmap="r.png"
terrainmap="t.png"
tilesize="64"
horizontalscale="3"
verticalscale="2"
>
<blurfilter> elevation randomisation matrix
<row data="0.03001 0.03002 0.03001" />
<row data="0.03002 0.03003 0.03002" />
<row data="0.03001 0.03002 0.03001" />
</blurfilter>
<foliagebandvegetation type, spreading and thickness
middle="0.55"
range="0.4"
density="0.00002"
sprite="/textures/veg/spruce.png"
spritecount="2"
scale="5"
/>
<roadsign sprite="/textures/roadsigns/uturnright.png" scale="3"> texture and size of roadsign images
<location coords="465, 467" oridegrees="5" /> positioning and orientation of individual roadsigns
</roadsign>
</terrain>
<weatheratmospheric settings like clouds, fog and rain
cloudtexture="/textures/sky/overcast.jpg"
cloudscrollrate="0.004"
fogcolor="0.4, 0.4, 0.5"
fogdensity="0.002"
fogdensitysky="0.5"
snow="500"
/>
<watertexture, transparency and water level
height="12"
watertexture="/textures/water/dark-water.png"
alpha="0.5"
fixedalpha="no"
/>
<vehicleoption type="/vehicles/seat/seat.vehicle" /> setting available cars (Deprecated since version 0.6.3; kept for backwards compatibility.)
<race coordscale="3, 3" targettime="212" codrivercpmode="free" laps="2" > scaling value of coordinates and time limit
<startposition pos="12, 884" oridegrees="20" /> vehicle positioning and orientation at start
<checkpoint coords="45, 723" notes="easy left long over finish" /> ccodriver note for guiding audio commands and hud icons
<checkpoint coords="25, 893" /> checkpoint
</race>
</level>
level
attribute
example value
possible values
description
name
Snowy Hills
Latin chars
Name of the track as it will be displayed in the game menu.
comment
Don't worry, be happy!
Latin chars
This will be shown as text message when starting the race.
author
John Doe
Latin chars
Credit to the map designer. It is displayed after selecting the map.
description
slow, curvy mud road
Up to 45 latin chars
A few words to describe what players should expect from this map. There is only one short line in the map selection menu to display it. If the text is to long it will be cut off at the end of the screen.
screenshot
ss.png
path
Link to a pixel image in the exact size of 256 x 256 pixel. It will be distorted in the in-game map selection menu to approximately a proportion of 4:3. Therefore it makes sense to cut your original screenshot to a 4:3 proportion and scale it down disproportionally to the final square of 256 pixel. This way the image will look undistorted in-game.
minimap
mm.png
path
Link to a pixel image in the exact size of 256 x 256 pixel. This will most likely be a scaled copy of your colormap or hudmap image.
terrain
attribute
example value
possible values
description
heightmap
h.png
path
Link to a square greyscale png file for setting the elevation levels of the map. For getting enough detail the image should not be less than 256 pixel large. Dark areas are lower than bright ones. This is one of the core sources of every map and should be kept in the map folder. Depending on the scaling of the map the resolution can be increased, but for performance reasons you shouldn't use larger images than necessary. It needs to have the same resolution as the other maps.
terrainmap
t.png
path
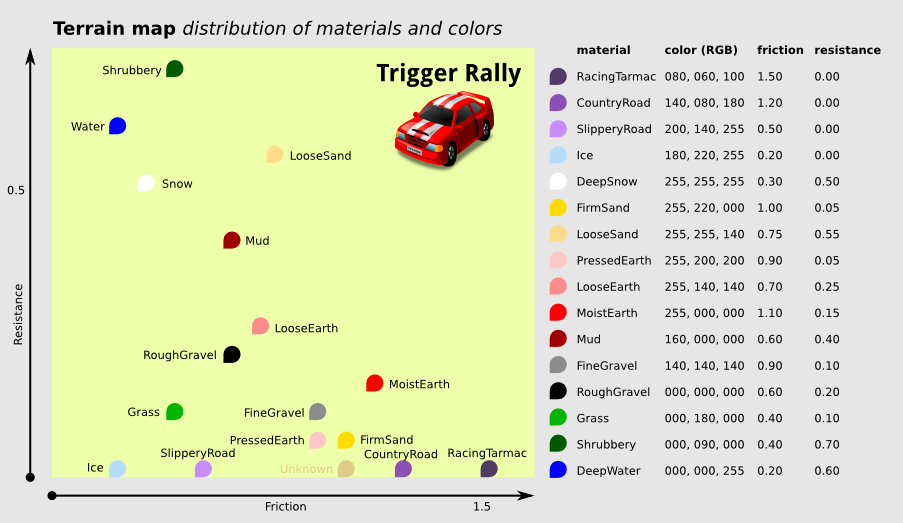
Link to a square color png file for defining the soild/road materials of the map. In src/include/terrainmap.h you can find a list of colors associated with predefined materials for different friction and resistance values in Trigger rally. The game scans your terrainmap file and the cars will be influenced by different physics according to the colors you define in your terrainmap file. Be aware that only exact values will be interpreted. Everything the game can not recognize as the one or the other material color will cause the default material. So it is a bad idea to smoothen ugly looking pixel jumps. This is one of the core sources of every map and should be kept in the map folder. If there is no terrainmap or a map with color values that differ from the pre-set selection the physics of something very gravel-like will apply. The terrainmap needs to have the same resolution as the other maps.
colormap
c.png
path
Link to a square color image file for setting surface colors of the map. In order to get enough detail the image should not be less than 256 pixel large. Since it contains the whole map surface in one image details will be very blurred. This effect is even worse if you are setting higher values in the horizontalscale attribute. This image is one of the core sources of every map and should be kept in the map folder. Depending on the scaling of the map the resolution can be increased, but for performance reasons you shouldn't use larger images than necessary. It needs to have the same resolution as the other maps.
foliagemap
f.png
path
Link to a square greyscale image file for setting the density levels of the vegetation on the map. Bright areas are denser (if you use the foliageband attributes accordingly). This is one of the core sources of every map and should be kept in the map folder. Depending on the scaling of the map the resolution can be increased, but for performance reasons you shouldn't use larger images than necessary. It needs to have the same resolution as the other maps. (The foliage can be switched off in the configuration file. Therefore your map should work without vegetation too.)
hudmap
h.png
path
Link to a square color image file which is used for the HUD map display in the game. Often the colormap.jpg is reused for this purpose. Therefore, offering a specificly designed HUD map image is optional. In some cases it might look better to have different colors, contrasts or even details in the hud map than in the colormap. It needs to have the same resolution as the other maps.
roadmap
r.png
path
Link to a black and white pixel image. Black parts indicate offroad areas. The roadmap should be wider than the normal road and allows map designers to discourage the use of possible shortcuts by using time penalties for offroad driving. Roadmaps are optional and need to have the same resolution as the other maps.
tilesize
16
power of two
Defines the visual range (in tiles) in the game. Valid are powers of two only. Obviously the further you can see, the better the game looks. But since the whole landscape in the visual range gets calculated constantly this value is very performance relevant. Keep it as low as acceptable, since high values will cause slower systems to end up with very low frame rates. Values above 64 have caused display issues on different systems.
horizontalscale
2.2
positive number (decimal points possible)
The higher this value is, the more the map will be scaled up. Distances are greater and landscapes are wider in comparison to the car. It is vital, to use the same value as in race/coordscale in order to fit the coordinates to the map. The more you scale the map, the more blurry the colormap projection on the landscape will become.
verticalscale
0.5
positive number (decimal points possible)
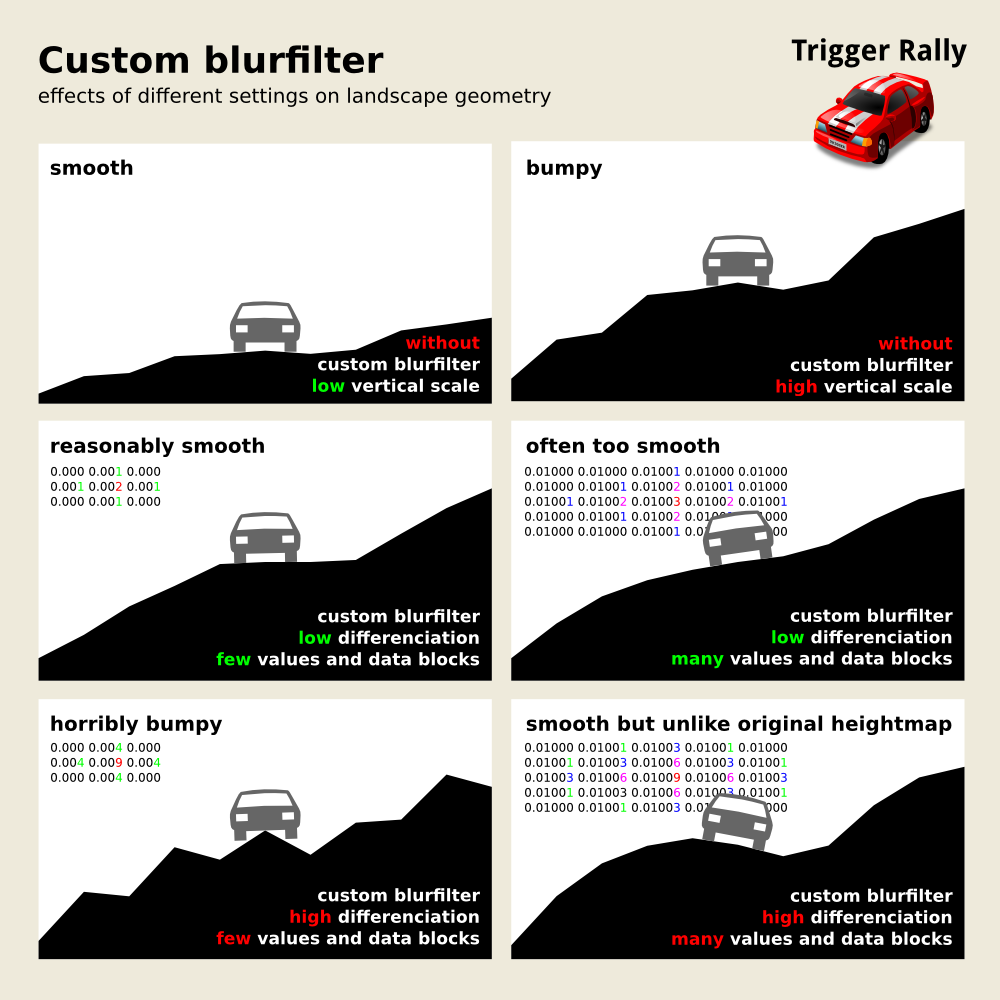
The higher this value is, the greater the distance between highest and lowest point on the map will become. Use vertical scaling wisely since even practically invisible graduations in the heightmap.png can lead to unpredictable bumps in the road if you use a high vertical scale value! If you use the optional blurfilter matrix you will need to adapt the vertical scale values heavily for getting similar vertical scale results.
blurfilter optional
In order to end up with a realisticly rough landscape the game engine adds a random height variation to the greyscale heightmap values by default. For maps with greater verticalscale values this has proven to be problematic since the road becomes horribly bumpy and undriveable very fast when the verticalscale value goes up. Therefore, the blurfilter is a way to control by hand how high the added variation is and how wide the smoothening of value differences spreads. For a visual explanation of the blurfilter, please consult our shematic graphic.
attribute
example value
possible values
description
data
0.01001 0.01002 0.01003 0.01002 0.01001
elevation variation matrix
You can leave out the blufilter matrix entirely if your landscape is smooth enough. This value alters the effect of the verticalscale value. For each data line you use you need to add a new value in all data lines. The more values you use, the wider the smoothening spreads. The higher the values differ fom another, the stronger the added bumps will become. You should use the matrix in a diamond shape: If you use three values you need to use three data tags too and the highest value should be placed as second value in line two. If you going to use five values for smoother spreading you need to have the highest value in position three on line three. The lowest values need to sit in the corners of the matrix.
foliageband optional, one for each vegetation type
attribute
example value
possible values
description
sprite
/textures/veg/grass-sprite.png
path
Link to a png file with transparent parts, used as vegetation sprite. Start the link with a slash in order to define that the path starts from the trigger-rally/data folder. Optionally use a relative link to a specific vegetation image in the map folder itself.
spritecount
1
low positive integer (not zero)
Number of images/axes used for each vegetation instance. The more images per instance you use, the better the result will look. But this comes with a high price: You can seriously increase rendering performance by cutting down this value. (Using more than 3 axes rarely makes sense anyway.)
middle
0.7
a positive number under 1
This defines at what brightness-level of the foliagemap a specific vegetation will be displayed. If you set it to a low value the vegetation will grow where the foliagemap is almost completely dark.
range
0.2
a positive number under 1
A low value here sets the vegetation to a very specific brightness level closely around the defined value of the middle definition. High values lead to this vegetation growing almost everywhere on the map.
density
0.05
a positive number (low under 1 recommended)
The higher the value is set, the thicker the vegetation will be.
scale (optional)
1
a positive number
The higher the value is set the bigger the vegetation sprite will be displayed. Before version 0.6.3 this value is ignored. Afterwards: Leaving out this attribute defaults to the value "1" for texture scaling.
roadsign optional, as many as you want
attribute
example value
possible values
description
sprite
/textures/roadsigns/zigzag.png
path
For each different sign in the map you need to specify a path to an image to be used as the roadsign texture.
scale
3
a positive number above zero
This value defines the scaling of this particular roadsign image. Therefore, all instances of this sign defined under location will use this scaling factor. You can create multible roadsign definitions containing their own location tags if you want to use the same roadsign image in varying sizes.
location optional, as many as you want
attribute
example value
possible values
description
coords
78, 887
two integers, separated by a comma and a space
The x and y coordinates of a individual roadsign. (The lower left corner is the point of origin.)
oridegrees
45
integer between 0 and 359
Defining where the roadsign texture will face in the map. Degrees are counted counter clockwise and zero faces down/south. This means if the value is zero then it is flat in front of you if you face it from south resp. from below. Roadsigns can be seen mirrowed from behind. Therefore you can use a right-tutrn arrow with a value of 180 in order to get a left-turn arrow.
weather
attribute
example value
possible values
description
cloudtexture
/textures/sky/blue.jpg
path
Link to a jpg file, used as tile in the sky. Start the link with a slash in order to define that the path starts from the trigger-rally/data folder. Optionally use a relative link to a specific sky image in the map folder itself.
cloudscrollrate
0.2
positive number (low decimal point recommended)
Velocity of the cloud/sky movement animation. Zero is static/no animation. A value under 1 will be fast enough for sure.
fogcolor
0.1, 0.4, 0.2
three positive numbers under one, separated by a comma and a space
Red/yellow/blue values to define the color of the fog. Higher values result in brighter colors.
fogdensity
0.01
positive number under one (low decimal point recommended)
Density of fog overlapping landscape and plants.
fogdensitysky
0.006
positive number under one (low decimal point recommended)
Density of fog overlapping the sky.
rain (optional)
500
positive integer
Density of rain. (This tag can be omitted.)
snowfall (optional)
500
positive integer
Density of snow. (This tag can be omitted.) In the trigger-rally.config file players can choose how snowflakes will be renered (textured, dots, squares).
water optional
attribute
example value
possible values
description
height
14
positive integer
This value sets at which elevation the mean sea level will be. Every point of the landscape below that specific value will be under water. The actual relative positioning of this integer value changes with the verticalscale and blurfiler settings.
watertexture (optional)
/textures/water/dark-water.png
path
There are several water textures available in the texture foder, but you can easily link your own instead.
alpha (optional)
0.4
positive number under one
A high value here makes the water texture totally opaque and you can't see the landscape under it.
fixedalpha (optional)
yes
binary
By default the water in Trigger Rally gets less transparent the deeper it is. If you want a fixed transparancy value no matter how deep the water gets, then you can add this value. This can be helpful for example if your water is rather shallow and you want to hide that.
vehicleoption one for each available vehicle, deprecated and ignored since version 0.6.3
attribute
example value
possible values
description
type
/vehicles/focus/focus.vehicle
path
Link to the vehicle definition file. Start the link with a slash in order to define that the path starts from the trigger-rally/data folder. (Starting with version 0.6.3 this value is depracted since all vehicles are available in each race by default. Unless not yet unlocked by winning events - since version 0.6.4.)
race
attribute
example value
possible values
description
coordscale
2.7, -2.7
two numbers, separated by a comma and a space (decimal points possible)
This value defines how much the coordinate values will be scaled. Both values need to be the same as in terrain/horizontalscale to ensure that the coordinates fit to the image map. (It's split into two values to enable you to set a negative value for flipping the direction. This could be helpful if you define the coordinates within a program where the point of origin is not the bottom left corner.)
targettime
243
a positive integer
Time limit (in seconds) for finishing the map. After reaching this time limit, the race will stop and the player has lost the race.
codrivercpmode (optional)
ordered
free/ordered
Ordered means that all codriver checkpoints need to be passed in the pre-set order. With ordered you won't get any further codriver commands after missing a codriver checkpoint because you raced to far off the road for example. With the value free the codriver checkpoints become optional. It doesn't matter if you miss one. You don't need to set the value to free since the game defaults to free if you omit the attribute. Maps containing crossroads or reusing the same road should have the mode set to ordered.
laps (optional)
3
a positive integer
This value defines how many laps the race goes. This is only functional if you work on a circular map. Be aware, that all notes will be repeated for every round. This means you will get "over finish" more than once.
startposition
attribute
example value
possible values
description
pos
120, 433
two integers, separated by a comma and a space
The x and y coordinates of the starting point of the vehicle on the map. The values relate to the 512 x 512 pixel map images. The coordinate origin is the bottom left. (It is possible to set values outside the map. Since in the game the map is tiled, this could lead to confusion. It's no problem to leave the original tile and to continue driving on the next one.)
oridegrees
90
integer between 0 and 359
Angle of vehicle orientation at the starting point. Degrees are counted counter clockwise and zero faces upwards/north.
checkpoint as many as you want
attribute
example value
possible values
description
coords
261, 76
two integers, separated by a comma and a space
The x and y coordinates of all checkpoints. (The lower left corner is the point of origin.) The order in this list defines the proper sequence in which the checkpoints must be reached in the race.
notes (optional)
hard left over tarmac
predefined keywords, separated by spaces
You can only use words available as file names (witout extension) in the codriver icons and codriver samples. Please check the folders content for a full list of available words! For consistancy through the game this should be the order of your commands: (CURVE_TYPE) + (LEFT / RIGHT) [ + LONG ] [ + [DONT] CUT ] [ + INTO... ] [ + OVER... ].